Monday, April 25, 2011

My Cookies Make Their Professional Debut

Yes, you heard right. I had my first actual order recently. Like, GIANT cookie order, and I got PAID for it. It was such a different experience, and so exciting! So here's the scoop: We have a family friend, Krista, who works for JMS Industries, which is a company that provides portable toilets for special events. Well, they were having a ribbon cutting ceremony, and Krista came to me and asked if I'd make portable toilet cookies as favors for the event! I cut and decorated 75 cookies for the event, the biggest batch I've ever done. It was a lot of work, but I planned it out better than I usually do and made sure to make extra time for them (I didn't have much room for error, it's not like it was just my family eating them), and they turned out pretty cool! I've never seen port-a-potty cookies before (believe me, I tried searching them on the internet)!


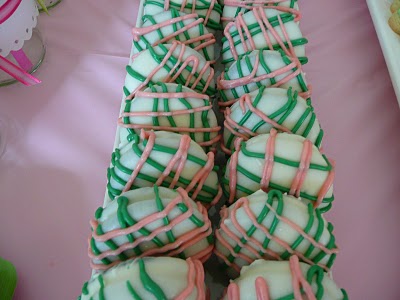
Ta-da! Here it is! These were actually a lot of fun to make, regardless of the amount and the pressure of doing them for a professional event. All the hard work paid off though, I'm told the cookies were a HUGE hit! I'm so glad to get such positive feedback from such an unbiased source!

Thank you Krista, for thinking of me and letting me contribute to your event!

Friday, April 22, 2011

Mom's Birthday Dessert Table!

These days, it seems like themed parties is becoming all the rage, especially with dessert tables. They're ALL over the internet. And they are SO. DARN. CUTE. I don't know if you've seen any personally, but there are so many cute and inspirational party idea blogs out there. Kara's Party Ideas and Gordon Gossip are my personal favorites. I highly recommend you check them out. I'll be very surprised if you don't spend hours obsessing over them. =) On that note, I decided to give a dessert table a try. We had a small get-together for my mom's "22nd" birthday, and I drew inspiration to do a pink and green theme from this super cute birthday banner my mom made, you can check it out here. So this is my dessert table I put together: It's not a lot, but it was so much fun to put together. And after all, it was only family and a few friends, it's not like I needed to provide a feast (thank goodness). It came together quite nicely, if I say so myself. It was a lot of work, but totally worth it. I made my usual cookies, white, pink and green flowers: I also made a cake at work. We got new fondant dots and gumpaste bows at work, and they made a SUPER cute little cake. The bow isn't edible, but the fondant dots are, and although I didn't expect them to taste very good (I'm not a fondant fan), they actually didn't taste bad at all!


I made some chocolate covered Oreos. Making these was SO much easier than I anticipated! You just buy some Wiltons candy melts and melt those bad boys down, dip the cookies, and BAM! You have chocoalte covered Oreos. Then you just melt down some colored candy melts and drizzle them on the dried cookies. So simple!


And finally, I made cute little lemonade bottles. We emptied A BUNCH of Starbucks Frappuccino bottles for these (24 bottles of coffee in 4 days? No problem!) and made super cute wrappers for them. Then we filled them with pink lemonade and topped it off with pink and green straws and bows for the ultimate cuteness.


It all turned out quite cute, and was quite a hit! I totally recommend doing this for a birthday party or shindig, it's sure to be a crowd pleaser. It's an effort, but totally worth it in the end!

Monday, April 18, 2011

Happy 1st Birthday Ashton!

Hey all, I know I've been slacking. Not to worry, I have a good 2 or 3 posts lined up for you in the near future. The first is the train cookies I made for my cousin Ashton's first birthday. They're made with my usual cookie and icing recipe, and the design is pretty simple. They went really well with his primary color train themed party! And here they are, all set up on their little plates (really cute setup, isn't it?)! Initially I wan't thrilled with the turnout, because they're a bit plain compared to my other cookies, but they were pretty popular at the party. Not my favorite work, but they did grow on me in the end.
I loved the way the colors turned out on these cookies. And although he didn't get to eat one, the birthday boy liked looking at them, too. Isn't he the cutest little conductor you've ever seen?


Friday, February 18, 2011

Valentine's Day Part 2

Even though you know I love making cookies, I was more excited for something else this Valentines Day. The cookies were fun and easy, sure, but the cupcakes...just made me giddy. They were pretty simple cupcakes too, but I was in love with them. Here they are:


See? So simple, but I love them so much! Obviously, a lot of love was put into these bad boys...the only thing I regret is the fact that I only made enough to hand out, and didn't make any extras for me and the family. That's ok, maybe next time. So, these are just red velvet cupcakes with cream cheese frosting (I TOLD you they were simple!). The topper is made from candy melts and and a fabulous candy mold I found at my local craft store. Do you want to know my FAVORITE part about these cupcakes?? The even MORE fabulous edible glitter heart sprinkles:

Absolutely love, LOVE them! Granted, they add nothing to the flavor of the cupcake, but they DO add sparkle and I am so smitten with them. And here they are, in their box and ready to be delivered...and eaten!


I'm now seriously craving a cupcake...but only if it has the cute heart sprinkles! I'm going to have a hard time topping this next Valentine's Day, if I do say so myself....Have a sweet day everybody! More to come soon!!

Tuesday, February 15, 2011

Happy Valentine's Day!

Now, I claim not to be a huge fan of this Hallmark holiday. I do admit, I think it's a little bit of a waste of money. You don't need to buy me jewelry or roses, or take me to a fancy restaurant to show me you love me....I won't say no to chocolate though. =) Despite my slightly negative outlook on the holiday, I was SO excited to make goodies this year! I went all out, making cookie boxes for my neighbors (and boyfriend), and providing the extra cookies for my mom's Valentine's shindig with her daycare kids. Here's the end result:


I know they look like a pain in the butt, but they were actually really simple. I got the idea to do the heart from Bake at 350 (of course), and it was a lot easier than I had anticipated. All you have to do is print out whatever image you want in the middle of your cookies, place a piece of wax paper over the image, trace it with some melted candy melts, and add the sprinkles to wet chocolate. Pop it in the freezer for a few minutes, and BAM! You have a perfect chocolate little design for your cookies. After you ice your cookies you plop the design into the wet icing and that's it! So simple! I've seen it done for baby shower cookies, with little chocolate monograms in the center, and I think this is such a clever and cute idea! Here's the cookies in their packaging, ready to be given out:


And since one of the daycare kids is allergic to eggs and nuts, and since my cookies contain both eggs and almond extract...the poor kid couldn't have one of my cookies. My mom purchased some rice crispy treats and I decorated it for him. He really loved his special treat (kids just love treats with their names on it, who knew?), and I was happy to make it for him.


So you see the reason for my excitement? And this is only HALF of it! The other half is yet to come. Soon though, I promise. Hope everyone had a good Valentine's Day!

Tuesday, January 25, 2011

Christmas Trees...

I seriously debated blogging these. These were by far my biggest fail, which is a shame, because I was VERY excited to make them. I made them for a Christmas party we had last month...so what did I do to "save" my fail? Dump a bunch of sanding sugar on them to make them sparkly! There's nothing like distracting with sparkles! My mom finally convinced me to put these on here...only because I think it's healthy to show mistakes, not just successes. What did I learn from my Christmas tree experience? Watch how thin you make your icing...if you make it almost watery, it will take ALL night and the next day to dry and it will have little pock marks all over it. The result? Not pretty.


Regardless, everybody at the party loved them. Good save with the sanding sugar. And good thing I have a mom who talks up all my work. =)


Sunday, January 16, 2011

C is for Cookie!

And cupcakes, and that's good enough for me. And it's good enough for my sister too, because I made these little guys for her 14th birthday. She always points them out whenever she sees them at grocery stores or on the internet, so I thought she'd like them for her birthday. And they were indeed a hit!


Heh heh, it's like a little army of Cookie monsters!! These little guys were super easy to make, considering I did a bit of cheating. I baked plain white cupcakes and bought some of those pre-made tubes of royal blue Wilton decorating icing. Just pop on a star tip, and bam! Furry monster cupcakes. Then I added big dots of white icing, and placed a chocolate chip in each one. Then you press a half of a Chips Ahoy cookie in their "mouths" and you have not just any monster, but a cookie monster! Nom nom nom!


Friday, January 14, 2011

Dragonflies. GLITTERY Dragonflies!

A while back, my friend Emily celebrated her birthday. Being a major dragonfly lover, she asked me to make her some purple dragonfly cookies for the occasion. Now, since I don't own a dragonfly cutter, Emily let me use hers...and let me just say I don't know that I'll be investing in a dragonfly cutter anytime soon. This was by far the hardest time I've ever had cutting out any cookie. Luckily, after much frustration, I was able to get about 3 dozen decent looking dragonflies from this darn cutter. Next was tghe fun part. Not only do I love the color choices, but this was the first time I've used sanding sugar (courtesy of Debbi) on my cookies.

So, it seems I'm having some issues with my icing still. Like my turkey cookies, I had an issue with the pink icing in the wings sinking in. I have no clue why that is. Regardless, I think the sanding sugar on the body makes up for the lack of awesome in the wings. And Emily liked her cookies, which is what matters when it comes down to it. And check it out! My mom made an extremely cute dragonfly birthday card to go with the cookies for Em. She loooves card-making and scrapbooking, and she's pretty good at it if I do say so myself. She makes really cute stuff. Check out her blog here, and see for yourself it's not just my slightly biased opinion. =)


Wednesday, January 12, 2011

I have the coolest family ever.

No, really, they are. Why, you ask? Well because I got a TRUCKLOAD of cool baking stuff for Christmas this year. I got cupcake wrappers, silver star sprinkles (which are REALLY cool, by the way), tons of new cutters, and...wait for it....brownie pop molds!! I've never tried making brownie pops or anything of that sort, but I am very excited to try it out!! Now, all these goodies were just from my parents and sister, but what I wasn't expecting was for my aunt to get me some cool stuff!


One of my favorite things to do is browse different blogs and websites for baking ideas. I could literally spend all day doing it. One of my favorite places to visit is a website called Bakerella. Have you visited Bakerella's site? If not, you totally should. She makes the cutest goodies! The thing she's most well known for is her creation of cake pops or cupcake pops. She even made a book about it, showing different pop designs and giving step-by-step instructions for each one. Weellll, my super cool aunt got me her book for Christmas!! It's really good I didn't buy it before Christmas because she would've been soo upset! It was difficult, but I resisted!


Not only do I get to experiment with these cupcake pops, but I also have several cake and cookie decorating ideas! Another book I recieved was this book called 1000 ideas for decorating cupcakes, cakes, and cookies.

Now, it doesn't have step-by-step instructions for anything (in fact, it doesn't even have labels for the pictures), but there are a lot of pictures with some really neat ideas! Granted....with the lack of labels, I have to figure out what some of the sweets even are, but if you can get past that, it's a cool book. I'd definitely recommend both of these books if you're looking for some great baking and decorating ideas. Now, it's time to try some of these ideas out! Thanks, family!!

Tuesday, January 11, 2011

A Sweet Gift!

So, in my absence, Debbi, my neighbor across the street came over to pay my mom a visit. It was just a normal visit, they stood around chatting about, you know, life. But after my mom told her about my interest in baking and decorating, my sweet neighbor ran out my door saying, "I'll be right back"! And right back she came....with about FOUR containers of baking goodies in tow. One of those containers was a Wilton cake decorating kit, FILLED with stuff (several icing colors, bags, tips, etc)! One container had several different colors of EDIBLE GLITTER (something I had yet to try), and the other two were PACKED with cookie cutters. And I'm not talking those cheap plastic cookie cutters you buy in a bucket of 100 from your local Wal Mart. Oh, no. I'm talking about those nice, easy grip ones, sets of Williams Sonoma cutters, and sets of copper cutters. All this stuff was just sitting in her house unused, so it all needed to go to a good home. Well believe me, it will ALL go to use at my house.

Unfortunately, I didn't get a chance to take a picture of all the stuff. There was so much, and it was literally taking over our dining room table, I had to get it put away. But I know you would've been impressed. =)

I could not express my excitement or my gratitude well enough. Well I probably could've, but that would've consisted of me jumping up and down at her door and squealing like a little girl. I wanted to at least TRY to act 20 years old. But it was like Christmas had come early! And I have sooo many more options for my goodies now. What a sweet gift from a sweet lady. Thank you soooo much, Debbi!

Monday, January 10, 2011

New Blog Design

Hi! Long time no see! I got pretty caught up in all the holiday fun, and playing with new goodies =) Things are starting to wind down now, so now I can do some catchin' up on my blogging. Believe me, I have a few goodies to share with you the next few days. As you may have noticed, I have a SUPER CUTE new blog design!! My mom found this for me and surprised me with the change, and I am SOO in love with it! It's so nice to have a change to bring in the new year! Thanks mom!


Goodies to come very soon, I promise! Pinky promise!