Wednesday, October 31, 2012

Spookables and Cuties

Happy Halloween everyone!! Last Friday my family hosted our annual Halloween party, and it was so much fun! And you know what that means...Creepy goodies were to be made. Actually, they were more on the cute side. Let me just make a confession right here, right now- I hate Halloween. I'm the BIGGEST scaredy-cat. Like, EVER. Scary movies? I don't watch them. I hate being scared. I don't even like the TRAILERS for scary movies. And don't even get me STARTED on zombies (More on that here). So, Halloween? Yeah...it's at the bottom of my favorite holiday list. So, when party time rolls around, I always try to steer my mom (who, of course, is the boss around here) to cuter treats rather than gross/creepy ones. So, my mom found some Jack-O-Lantern cookies that she fell in love with in a Halloween Country Living book that WEREN'T creepy, and the rest was history. Halloween party favors for over 40 people? Challenge freakin' accepted.


Here they are. As you can see I had a lot of fun with the faces. Which is surprising, because as some of you know, I have OCD. And if you don't know, Hi, I'm Britt, and I have OCD. You'll notice with my other goodies that I tend to make them as uniform as possible. So when I started making the faces on these, I imagined I was going to have an aneurysm before I was done. Surprisingly, once I got started, I came to accept that each pumpkin needed their own personality. Maybe this means that I'm on the right track to not being crazy? Pfft, yeah, probably not.

This little guy here I made special for my boyfriend Broc. As you'll remember from previous posts, he's...how shall I say it? Nerdy (It's ok, I can say it. I'm nerdy too). So I decided to leave a little surprise on his pumpkin for him to find.


Anybody see it? Anybody? How about any Lost fans? Look real close...you should be able to see certain numbers.....No? Well Broc saw them, and he thought it was the coolest thing ever. Seriously, he LOVES Lost (if you see him, do NOT bring up Lost unless you're ready for a nice long discussion about how awesome it is). It's the little things. And that's why I love doing this stuff for people.

Have a Happy Halloween, everybody!! Stay safe!

Monday, October 1, 2012

Luau Cupcakes!

Have you ever seen a how-to on Pinterest and thought, "I could totally do that!!"? I only think this, like, ALL the time. How about this: you think this, then TRY it, and it turns out just...meh...? That's the experience I had with these babies right here:


Allow me to introduce...my luau cupcakes! Well...kinda. I mean...You can see where I was trying to go with this, right?? Ok, so, as always, I found a tutorial on Pinterest to make pretty flowers out of fruit rollups. Check it out here, because the originals are gorgeous and the tutorial is actually pretty cool. WELL, my mom had planned a luau day for the daycare kids, so I seized the opportunity to try out these flowers, because, well...I think they kind of look like the flowers on those plastic leis. You see? The concept is there, it's just the execution didn't exactly go as planned. Fruit rollups? Yeah...they're a bit on the sticky side. And the uncooperative side, as it turns out.

Anyway, on to the cupcake portion. What flavor is more luau-ish than pineapple? None, that's right. Except for maybe coconut. So, remember when I told you in my last post that I'm a sucker for easy?? These cupcakes are the epitome of easy. I don't think I've made easier ones. All it takes is a box of yellow cake mix and a can of crushed pineapple. No, really, that's it. I know, too easy to be true, right? Wrong! And the frosting is just as easy!! Cream cheese and marshmallow fluff, I kid you not. You can find the full recipe here, and you'll notice that the original recipe calls for crushed pineapple in the frosting too. These cupcakes were for a bunch of three-year olds- do you really think they would've eaten the frosting with pineapple chunks in them? We have a hard time getting one of our girls to eat chicken, for god's sake.

So please, go try these yourself! They're so easy, and REALLY yummy. And this is coming from someone who does NOT like pineapple, so you can't go wrong!! And if you try out the fruit rollup flowers, give me some feedback as to how they turn out! I always love new and/or better ways to do things!!

Monday, September 24, 2012

My Take on Gingham: Picnic Cookies!

It's been over a month...can you tell that school has started?? And I don't know what came over me when I picked my classes for this semester-- It's like I picked the classes that would give me the MOST homework in one semester! Way to go, self.

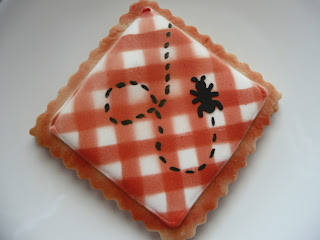
Anyway, have you guys seen this tutorial on how to make gingham cookies?! Flippin' GENIUS. And SO easy. If you guys have read any of my previous posts, you know that I am a sucker for easy cuteness. So, I saw this tutorial and knew I just had to find a reason to make these... But alas, no birthdays were coming up, a rarity in my house. I also wanted to make something cute and summery...Hmm...Something summery and something gingham... Well, DUH. Picnic cookies!! So I followed the simple tutorial with Red Wilton color spray to make my cookies resemble a picnic blanket.


And what's a classic picnic blanket without ants crawling all over it?? You like my ant?? I'll let you in on a secret: That ant? Totally paper punched. No joke, I used the same black sugar paper that I used for my honey's Creeper Cupcakes, and uh, stole *ahem* borrowed my mom's ant-shaped paper punch. Creepy, crawly perfection! Who'da thought? I just adhered it to the cookie with a damp Q-tip, and added the crawly lines with my edible ink marker, and I had myself a creepy critter trying to get in on this picnic business!

Lesson learned? Sometimes it pays to be a sucker for easy.

Til next time! Stay sweet!

Wednesday, August 15, 2012

Anniversary Heart Cookies

Recently, my parents celebrated their 22nd wedding anniversary. That's right, I said TWENTY-TWO YEARS of wedded bliss. I could only hope, when I get married, to have a marriage as good as theirs-they make it look so easy. To celebrate their anniversary, my dad surprised my mom with a weekend getaway to Tahoe. Also to celebrate, I made them these cookies to bring on their mini-vaca:


I used my usual cookie and icing recipes, and made them as close to their wedding colors as I could. Well...their colors were teal and dusty rose. I got the teal color right on but the pink...you say dusty rose...I say light pink...Tomayto, tomahto (Read: my friggin' dusty rose color gel was dried out). I then used the drag technique that I love so much to make the hearts around the outside of the cookies. I seriously need to use this technique more often. So simple, yet so elegant. If you haven't already seen it, I found the technique for it here.

Happy 22nd anniversary, Mom and Dad!!

Sunday, August 12, 2012

Local Yummies: Mazzetti's Bakery

My boyfriend Broc loves the ocean. So for his birthday at the end of June, I thought what better way to celebrate than taking him to the ocean? So I planned a weekend getaway to Pacifica for us to celebrate, relax, and enjoy the beach. In addition to scoping out beaches and restaurants for us to try, not surprisingly I also scoped out any local bakeries. There I found Mazzetti's Bakery.

Ta-da!


I liked this place because it is easy to locate and it has EVERYTHING. Honest to blog, it had muffins, breads, cookies, cakes, donuts, and even stuff I didn't recognize. It was all quite overwhelming. What to get? So many decisions....can I just have one of everything please? I ended up going back to the hotel with a cannoli, and Broc a strawberry popover. One of my favorite things about this bakery? The packaging:


I don't know why, but I find the fact that they boxed and tied up my cannoli just adorable. If it weren't for the fact that there was something delicious waiting inside for  me, I wouldn't have wanted to open it. Good thing I did...

Um...YUM.

This cannoli was just freakin' fabulous. The cream filling was nice and light, the chocolate dipped shell hit the spot and the cherries on the ends were a cute touch. I'm a sucker for cherry anything. Satisfying for the girl with the perpetual sweet tooth.


This, folks, is Broc's popover. All I can say about this is: flaky. Fruity. Goodness.

You should really check them out. Check out their website here, or if you're in the Pacifica area, stop in and get some goodies! You won't be disappointed!

Wednesday, August 8, 2012

SSSsssSSSuper Cute Creeper Cakes

Another geeky post again, folks! As I've said before, my boyfriend and I are kind of...nerds. We both play a variety of games, and we don't necessarily have the same taste in games. But one of our favorite games to play together is Minecraft. If you're not familiar with Minecraft, it is basically a game in which players can build anything they imagine out of cubes in a 3D world. The concept is simple (Read: sounds dumb), but it's a lot of fun! There are also monsters in the game, and probably the most well known are the creepers. Here's what a creeper looks like in game:
Terrifying, isn't it? ;)

So for Broc's birthday, I decided to replicate these creeper cupcakes I found on Pinterest, originally created on the Candy Bar Cupcakes blog. Here's how my cakes turned out:


Do you see the resemblance? Instead of using chocolate cake, I just made a white cake and colored it green to match the face. The black for the face is made from sugar paper- I used a square paper punch to cut out the eyes and totally free-hand cut the mouth. My favorite part about making these was the technique used to make the different shades of green on the icing (Also explained in the original blog post- check it out here). It's so simple, if you guys ever find an opportunity to try this kind of technique, you so should. To shade the cupcakes, I made a template out of a piece of cardboard and cut out squares and pixel-y (is that a word?) shapes. Then you put your template over the cupcakes and give it a quick spray with green Wilton Color Mist. So. Simple. Anyone else tried this technique? I can't wait to try it out again!

So there you have it! Easy creeper cupcakes for my awesome gamer boyfriend. =)

Sunday, August 5, 2012

Happy Birthday Jake!!

I love sprinkles. LOVE them. Do they add anything to the flavor of the treat? Not necessarily. But they ARE super cute, and they add a nice crunch, which I like. So when I found these adorable dinosaur sprinkles, I just couldn't wait to use them. I found the perfect opportunity when one of our daycare kids, Jacob, asked for "pops" (cake pops) for his third birthday.


Gah! Aren't they so cute?? I seriously need to find a giant jar of them so I could use them all the time, they are just too dang cute. To make these I dipped white cake balls in chocolate melting chocolate. This is actually probably one of my favorite combinations so far...not too surprising considering my all-time favorite cake flavor is yellow cake with chocolate frosting.

All the dino pops!

Does anyone else have a major slight sprinkle obsession? Or is it just me? I love stopping in craft stores and grocery stores to see if they have any cute sprinkles I could possibly use...Even if I CAN'T possibly use it, I buy them, you know, "just in case". =)

Happy Birthday Jake!!